MAME software runs on a computer. And modern computers do not have any simple I/O pins any more .(remember the parallel port that used to be on every computer for connecting a printer ?) So to connect switches and joysticks you will need some kind of interface that translates switch actions to USB. Early MAME builders cracked open standard keyboards and hard wired their switches to the different keys. This worked, but was quite difficult. Especially low cost keyboards did not have easy to solder contacts or convenient connectors to hook up to. Nowadays the most common solution is a dedicated controller that has lots of easy connectible inputs and USB output that just pretends to be standard keyboard. Best known are the UltiMarc I-Pac , OptiPac or J-Pac. An even lower cost solution are the Xin-Mo controller boards (aroun US$25,-, including the wires).
But to keep the cost to a minimum I intend to use what I already have...
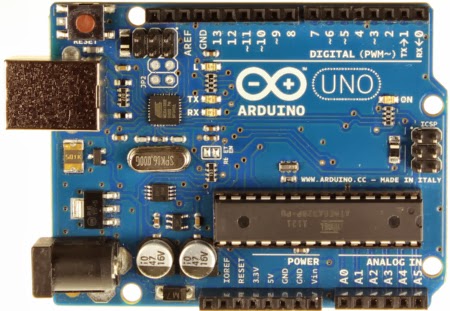
It's got 14 digital I/O pins so that should be enough for an 8 way joystick + 7 buttons. (An 8 way joystick only has 4 switches). Since one of the buttons is just the 'Start' button so it will not need a fast response time I could also connect that to one of the analogue inputs and thus free 4 I/O pins for controlling additional stuff like lighting, sound or LEDs.
What I need is the Arduino to emulate a keyboard or to behave like a 'HID' (Human Interface Device). And if you know what to look for something like this is easy to find. Like on the blog of MitchTech. Now I did not immediately get the idea of this, until I realised that the Arduino board actually contains TWO different micro-controllers. One is the main controller (a ATmega328) that runs the Arduino 'sketches' and a second one (ATmega16u2) that just takes care of the USB communication from your PC to the main controller. And this communication controller is what we are re-programming to switch from a virtual COM port to a HID device.
First we will need a 'DFU' programmer. I use Windows, so I'll use 'FLIP' The procedure seems simple enough. Reset the Arduino, use FLIP to upload firmware. But I seem to have a problem with the reset. When I release the reset the board starts running the last sketch I've programmed it with, and it certainly does not show up as a new device. Which in turn is required so I can install the USB driver that FLIP needs. And of course I just overlooked something. When you have a non SMD Arduino board you should solder a resistor at the back. Yes, that is mentioned on the MitchTech page... (And it's no longer required with the latest revision of the Arduino UNO)
I just assumed I had a SMD board since there are many SMD components on the top of the board. But it's probably only so if the processor itself is a SMD version.
 And indeed, when the resistor is mounted and we short circuit the two pins, left-top of the board, the unit shows up in the Windows device manager as a 'DFU' device. Left click on it, select 'Update Driver' and select the driver from the FLIP->usb directory. Then it shows up as an A90USB8. And when we unplug it and plug it back in it is again visible as the virtual serial port.
 Now we need to know what codes should be sent when a button is pressed. Which keys do we need to play MAME games ?
The full overview is on this page. And this is the selection of the ones I think I'll need:
- Key Function HID Key
- 5 Insert coin 34
- 1, 2 Start (players 1, 2) 30,31
- Arrow keys (U,D,L,R) Move Joystick 82,81,80,79
- Left Control Button 1 Bit0
- Left Alt Button 2 Bit2
- Space Button 3 44
- Left Shift Button 4 Bit1
- Z Button 5 29
- X Button 6 27
- ESC (Escape) Quits the game 41
First I just used the MitchTech sample program. This just detects what pin is activated, sends a single key and then after 100 mS a 'releasekey' command. So if you press and hold a button you are sending 10 keydown / key-release commands per second. This works, but not very good. Most MAME games do not respond very well to a constant stream of key-presses. The movements often get a bit jerky, probably due to a regular key-buffer overload. Also it just sends one key at a time while the keyboard code does allow for multiple keys.
In my program I created a loop that checks every time which contacts are closed, find the keyboard code that has to be generated for that contact and add that to the keyboard message. Then only send the message itself when its different from the previous one. And when a key is released its code is forced to 0 so a key-release is only sent once. Also I use some analog inputs as extra inputs for buttons by just reading the voltage on that input. Note that these inputs are 'floating' so if they are left open the result may be unpredictable. You will need to add pull up or down resistors to the inputs.
So in the end the program looks a lot different but does exactly what I need:
MAME.ino (on my Google Drive)
Now what I love about software: you can re-configure the buttons and joystick at no cost after you wired them...

Testing is a little hard since most normal software does not really show you if you pressed a Control or Shift key. But the 'GhostKey' program is an extremely simple way to test what code your keyboard is sending.
While testing this set-up with the actual buttons I noticed another problem. How do you insert a 'coin' to get the game started when you don't have an actual coin-slot ?

(Note: If you start out without a board and want to buy one it is probably better to choose the Arduino Micro since that has 20 I/O pins and 'mouse' and 'Keyboard' commands built in)
Ctrl Alt and....CRASH..
After a while I noticed that the system sometimes seems to crash while playing games that use both the A and B button. Some further investigation showed that it actually happened when pressing the buttons AND moving the joystick Left or Up. What actually happens is that you create the key combination Ctrl Shift and Left arrow, which is caught by the Intel graphics driver. So it just rotates the screen, or changes the resolution and (worse) throws you back to the main window. The solution was simple. Left click on the desktop, select 'Graphic options' and in the Intel graphics settings just disable hotkey support.
No comments:
Post a Comment